The Gameboy Camera makes a good bridge between physical and digital art. The limited resolution, and number of colors make it possible to transpose the pictures into the physical world. It is “possible”, but not “easy” as the 128×112 resolution amounts to more than 14 000 pixels total. It is small, but not “that” small when you choose to make them by hand. I spent a bit more than 10 hours reproducing this picture by hand on graph paper.


I love print-making, and Gameboy Camera pictures makes a good playing field between the graphic illustrations of linocut, and the highly detailed photo-transfers.
With only 4 colors, it is possible to make multi-layer prints, one for each color. With the white color being the paper’s color left untouched, we have a nice 3 layer print.

I have access to a laser-cutter/engraver at a local fablab. It is basically a laser mounted on rails, that can be controlled by a computer. You define the path of the laser, either using a rasterized image (in this case the laser works line by line, such as a printer), or using a vector drawing that the laser follows. The laser speed and power can be adjusted so the wood is burnt only on surface (engraving) or along its entire depth (cutting). The laser is highly precise so it is really good for making relief print blocks.
When laser-engraving, it was challenging to preserve the pixel look and shape. Too much power and the pixels corners would be burned, appearing like rounded dots. Too little power, and the engraving would be too shallow, causing troubles with inking and printing. Getting the right result demanded some tinkering as it is highly dependent on material, as often with laser-engraving.
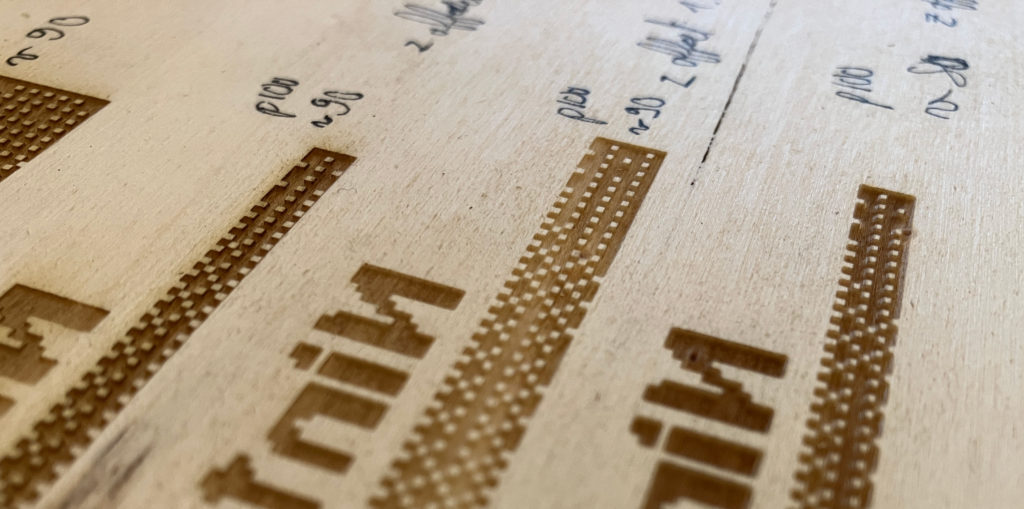
I separated the colors of the picture, to engrave 3 blocks of plywood. A design choice was to work with overlaying layers, such as the lightest layer includes the darkest. So the first layer includes light gray, dark gray and black pixels, the second layer includes dark gray and black pixels, and the third layer includes black pixels. It produces a cleaner print than using one pixel color per layer, because the smallest alignment error would produce an outline at the frontier between two colors. Also, printing errors (due to bad inking, or to the uneven surface of the wood) would be less noticeable as the next layer grant us a chance to correct those artifacts.


I also built a registration frame that allowed me to aligned precisely the paper when printing the successive layers. Such a tool is quite handy, especially when printing big volumes. I made it flexible so I can use it with different margin sizes for my next projects.


I printed by hand using a baren, lino ink, on Japanese paper (45g/m², from “Vang” brand) which is thin enough to print without wetting the paper (which would be impossible with water-based ink), but strong enough to resist the successive prints.


The more I printed, the more I tended to use more ink, because the wood absorb quite some ink. As a nice side effects, the excess of ink bleeding produced very interesting and organic results, the corners of the pixels got slightly rounded, The adjacent pixels also got a bit blended together, which is particularly nice given the dithering “checkerboard” patterns of those pictures. The thick layers also add some interesting depth on close-ups. On the flip side, each layer takes longer to dry.


Using this technique I made several prints, my 2023 greetings cards, and a mini A4 zine.


This technique brings a lot of organic feel to this highly digital pictures. The imperfections, the bleeding of the ink, and the uneven texture of the wood add up a lot of character.

My work will be featured in the third issue of “Faits et Gestes” a fanzine about printmaking for all and DIY printmaking techniques, for which I produced 50 original prints, printed by hand !
For another experimentation bringing digital Gameboy Camera pictures in the real life, check out my Gameboy Diapositive.